Why & How to Convert MP4 to MP3
MP4 and MP3 are two commonly used formats. MP4 is primarily known for its video capabilities, and MP3 is synonymous with audio. In some cases, you may need to convert a video file to an audio file. For example, maybe you just want to listen to music on a dedicated music player while on the go, or insert an MP3 file as background music in a project for a presentation, or share it with others more easily.
Fortunately, MP4 to MP3 Converter can help you do this easily. In this post, we will walk you through the benefits of converting MP4 to MP3 and how to convert MP4 to MP3 audio files.
Table of Contents:
Why Convert MP4 to MP3?
So what are the benefits of converting MP4 to MP3 files? It depends largely on your needs. Compared to MP4 files, MP3 files are usually much smaller in size, making MP3 a more efficient format for storage.
MP3 is a widely supported audio format that is compatible with a wide range of devices and media players. Converting MP4 to MP3 is useful if you want to save space on your device or make it easier to share audio content with others.
Or you may want to extract audio separately from a video file for use in other projects, such as background music in videos, presentations, and multimedia projects. Turning MP4 into MP3 will simplify the process of adding audio to such projects.
How to Convert MP4 to MP3 Online with Online MP4 to MP3 Converter?
When it comes to turn MP4 to MP3, Cliplfy provide an easy & fast feature to change your video to audio format online, you don’t need to download any app or software, all is in your browser. Beside converting video to audio, Clipfly also offers a wide range of video editing features, including merging your video clips to create a cenimatic movie, adding filters to your video to enhance the vibe, and much more.
Here’s how to use Clipfly’s fast mp4 to mp3 converter:
1. To get started, simply open Cliplfy and access the video editor.
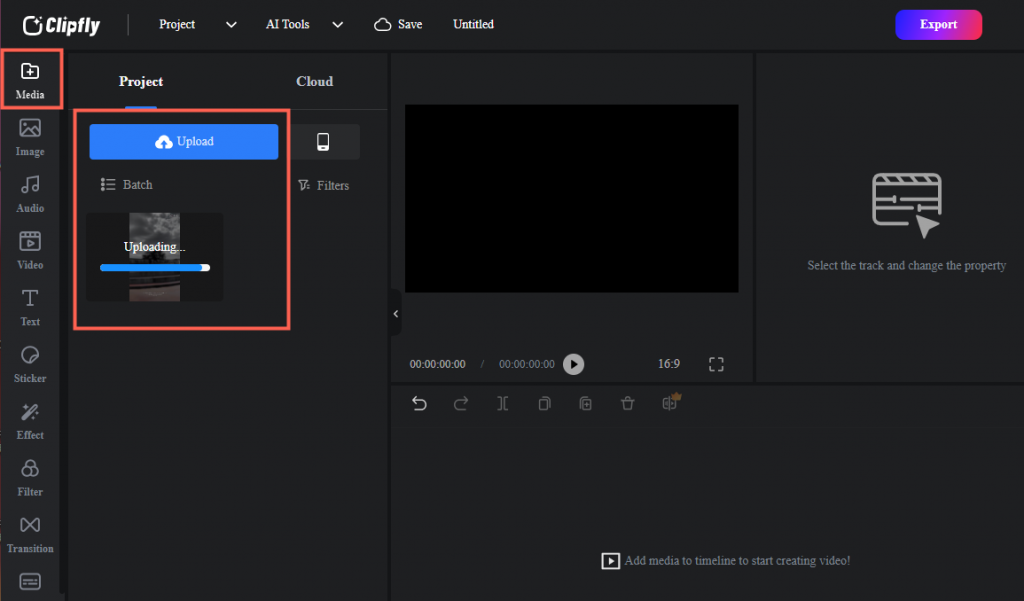
2. From there, click on the “Upload” button to import your MP4 video file, as well as any other media files you may want to include in your project, such as audio or images.
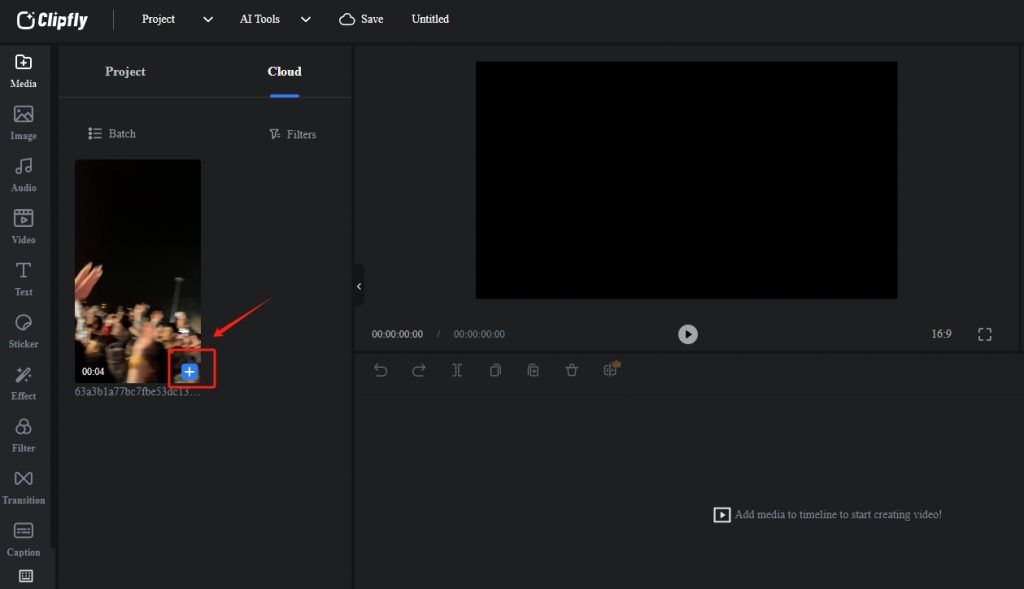
3. Once your video is uploaded, hover over the video and click the “+” icon to add it to the timeline. Or you can also simply drag and drop it to the timeline.
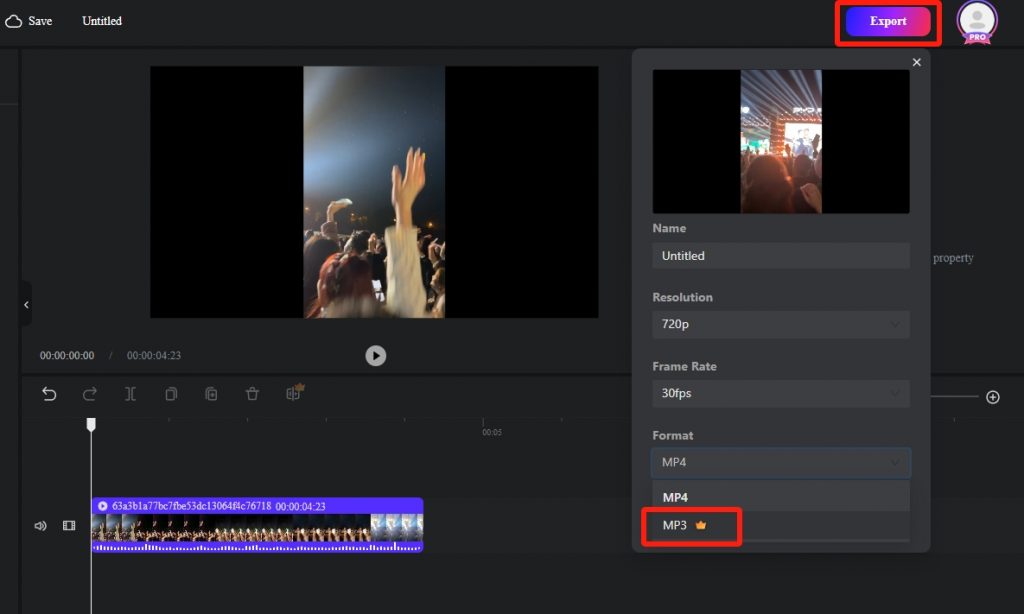
4. Next, select your video from the timeline and click on the “Export” button located in the upper right corner. From here, choose the MP3 format as the output and select the location where you want to save your converted file.
That’s it! With just a few simple clicks, you’ll be able to convert your MP4 video to MP3 format, making it easy to add to your project as background music or play it on your audio player any time you want. Enjoy the convenience of this mp4 to mp3 converter online and start converting your videos to MP3.
How to Convert MP4 to MP3 on Windows?
To convert video to MP3 on Windows, you can use the VLC Media Player, which is a versatile and free multimedia software.
Here’s how:
1. If you don’t have the VLC Media Player, download and install it from the VLC official website.
2. Open VLC Media Player. Click on “Media” in the top-left corner and select “Convert/Save…” Or you can use the shortcut key Ctrl+R to get started.
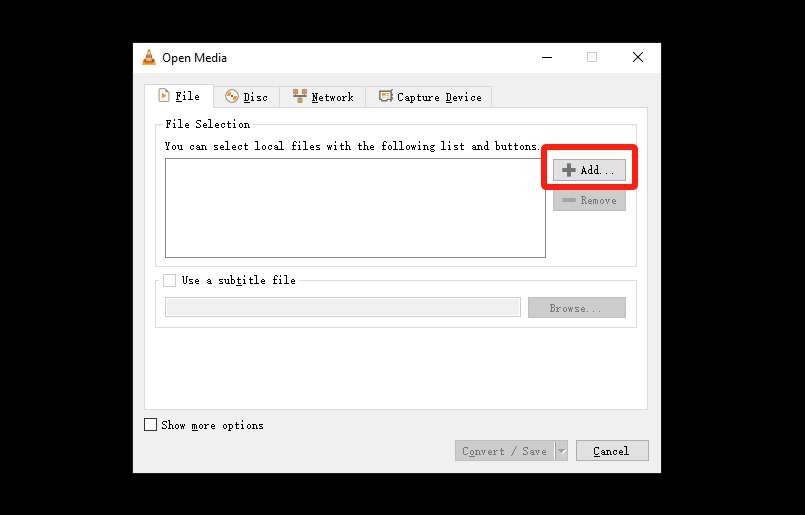
3. In the “Open Media” window, click the “Add” button to add your MP4 file to the list.
4. After adding your MP4 file, you’ll be presented with the “Convert” window. Here, you need to specify the output format. To convert your video to an audio format (MP3), choose “Audio – MP3” from the profile dropdown menu.
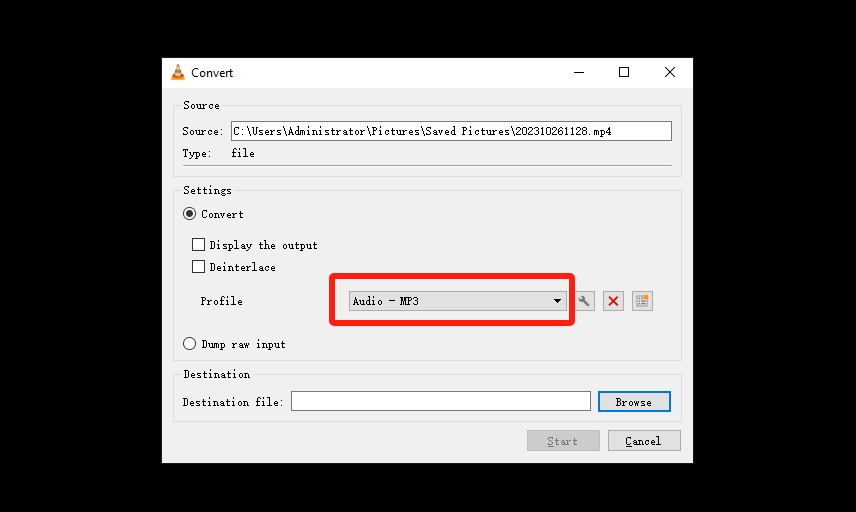
5. Click the “Browse” button to select the destination folder you want the file saved to, and provide a name for the output MP3 file.
6. Click the “Start” button to begin the MP4 to audio conversion process.
7. VLC Media Player will convert the MP4 file to MP3 format. You can track the progress in the VLC window.
8. Once the conversion is complete, you’ll find the MP3 file in the destination folder you specified.
How to Convert MP4 to MP3 on Mac using iTunes?
iTunes is a multimedia player and media management app developed by Apple. You can use it to easily change video to MP3 on your Mac device.
Follow the step-by-step guide:
1. Open iTunes on your Mac. If you don’t have iTunes installed on your Mac, you can download and install it from the Apple website or the Mac App Store.
2. Click “File” in the top menu bar. Select “Add File to Library” if you want to convert a single MP4 file or “Add Folder to Library” if you have a folder with multiple MP4 files. Locate and select the MP4 file(s) you want to convert and click the “Open” button.
3. You can create a playlist to organize the MP3 files you are going to create. To do this, click on the “File” menu, select “New,” and then choose “Playlist.” Give your playlist a name.
4. Next, select the imported MP4 file you want to convert in your iTunes library.
5. Go to the “File” menu. Select “Convert,” then choose “Create MP3 Version” (or “Create AAC Version” depending on your iTunes settings).
6. iTunes will convert the selected MP4 file(s) to MP3. The duration of the conversion process may vary depending on the length and complexity of the video.
7. Once the conversion is complete, you’ll find the newly created MP3 file in your iTunes library. To locate it easily, you can use the “Recently Added” playlist or search for the file by name.
Summing up
By the end of our guide, you’ll have a thorough understanding of how to convert MP4 to MP3 files. Whether you’re looking to save space on your device, extract audio from videos, or improve the portability of your multimedia files, this guide will equip you with the knowledge and tools needed to make the conversion process easy and efficient.
So go ahead and convert those MP4 files to MP3, and start enjoying the benefit of format conversion!