How to Edit a Video: a Comprehensive Guide for Beginners
You might have captured some meaningful moments through your camera lens, but simply sharing the raw footage on social media can feel a bit ordinary. How can you transform your work into something engaging and compelling for your audience? The answer lies in the art of video editing – adding finesse through cuts, transitions, subtitles, and more.
Whether you’re aiming for a montage masterpiece, an engaging explainer, or a compilation that tells a story, the key to standing out lies in the details of your edit. While each project may bring unique editing demands, the foundational principles of basic video editing remain constant. And understanding how to create and edit videos is a valuable skill.
In this article, we will share valuable tips on video editing and discover how to edit a video with precision and artistry, helping you craft a stunning and breathtaking video effortlessly.
Table of Contents:
Tips for Video Editing
Before diving into video editing, it’s essential to prepare your footage and clarify the goals you want your video to achieve. The following tips will guide you through the entire process on how to edit a video, highlighting key steps and important precautions.
1. Organize Your Footage
Start strong by keeping your video files in order. Create folders, use clear file names, and get your footage game-tight. A neat setup not only saves you time but also makes sure you can find the right clip when you need it – no more hunting around like you’re lost in a maze.
The another important thing is don’t forget to back up your media to avoid the risk of losing your projects.
2. Set a Goal
Get your game plan in place before hitting the edit button. What’s the vibe you are going for? Are you aiming to tug heartstrings, share info, or just make folks laugh? Having a clear goal makes editing a breeze. It’s like having a roadmap; you know exactly where you’re headed.
3. Preview and Choose Your Footage
Before you start cutting, give your footage a good look. Pick the clips that match your goal and contribute to the flow of the video. It’s like choosing the best puzzle pieces—each one should fit just right to make your story complete.
4. Pick the Right Music
Hit the right notes by picking killer music. Your video’s like a dance, and the music sets the rhythm. Match the vibe, consider the beats, and make sure your soundtrack vibes with the mood you’re aiming for. It’s the secret sauce that turns a good video into a showstopper.
Add some rhythm to your video by choosing the perfect music. Match the vibe and pace of your footage. The right soundtrack can turn a good video into an amazing one, enhancing emotions and setting the tone for your audience.
5. Rough Cut
Time to put things together with a rough cut. Don’t worry about perfection just yet, focus on getting the flow right. This is your video’s first draft, a chance to see how everything fits before you start polishing.
6. Refine
Refinement is where your video truly comes to life. Fine-tune your edits, paying attention to transitions, pacing, and visual aesthetics. Address any inconsistencies and ensure a seamless and engaging viewing experience.
How to Edit a Video with Clipfly Online?
Clipfly, your all-in-one online video editor, offers a user-friendly interface and easy-to-use video editing tools. Easily cut, resize, add captions and images, and do more to enhance your video within minutes, all in a remarkably easy and straightforward manner.
Here’s how to edit a Video using Clipfly:
1. Add Your Media to Clipfly
It’s time to start editing. First, you need to upload your footage to Clipfly.
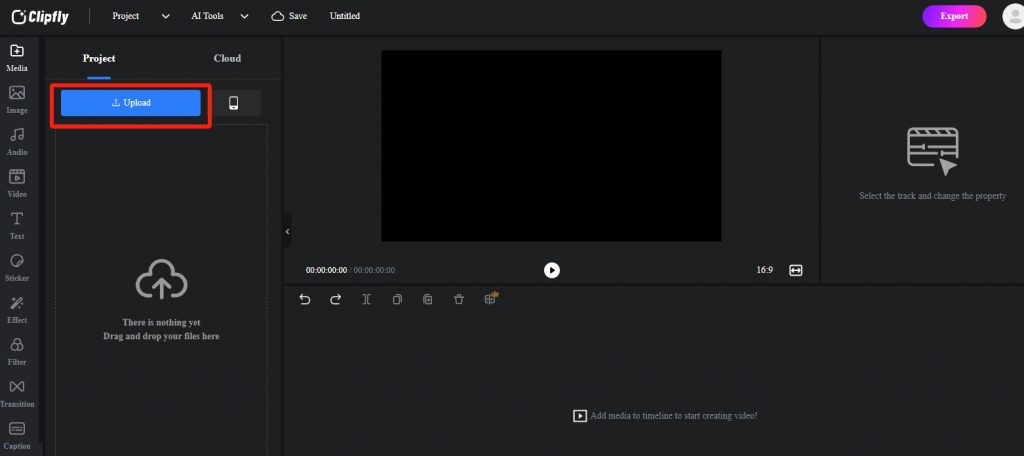
Head to Clipfly, click “Try for Free” to initiate, and go to the left panel, selecting “Upload” to import your media files. Alternatively, drag and drop your media files to the canvas.
Explore Clipfly’s library of royalty-free stock images and videos, cherry-picking the ones that resonate with your vision. Adding them to the timeline is a breeze – hover over your chosen media, then click the blue “+” button.
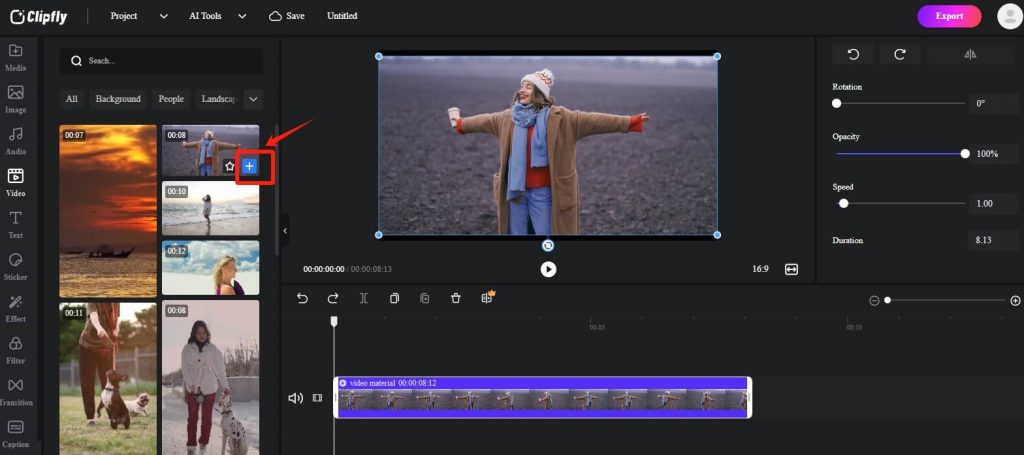
Now, dive into the editing realm. To edit your video, simply choose it either directly on the canvas or from the timeline. The creative journey begins!
2. Split & Trim Your Video
Enter the realm of precision editing with Clipfly’s versatile tools. Tailor your video to perfection by splitting, cutting, and trimming scenes. To split your video, simply move the cursor on the timeline to the location you want to split, and then apply the “Split” tool above the timeline, and your video will separate instantly. Or you can use the shortcut key Ctrl+B to achieve this.
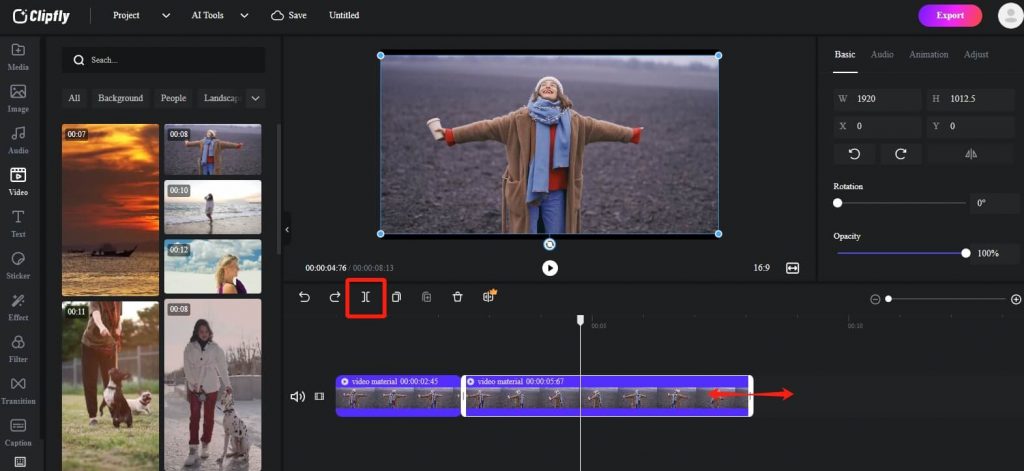
If you think a video clip is too long, you can adjust the length by dragging both ends of the timeline, easily shorten the video, and trim unnecessary video content. Once satisfied, don’t forget to add smooth transitions between your video clips by clicking on the “Transitions” tool to make the content transition more natural.
Whether you’re refining the duration for storytelling impact or eliminating unwanted segments, these editing features empower you to mold your narrative with finesse.
3. Add Music to Your Video
Clipfly provides a royalty-free music library, enabling you to choose tunes that enhance your video’s mood. Find the “Audio” option in the left toolbar, and you can browse and add music you like here. From stylish music to funny audio effects, such as laughter and alerts, you can always find the perfect background music and audio tracks to suit your videos.
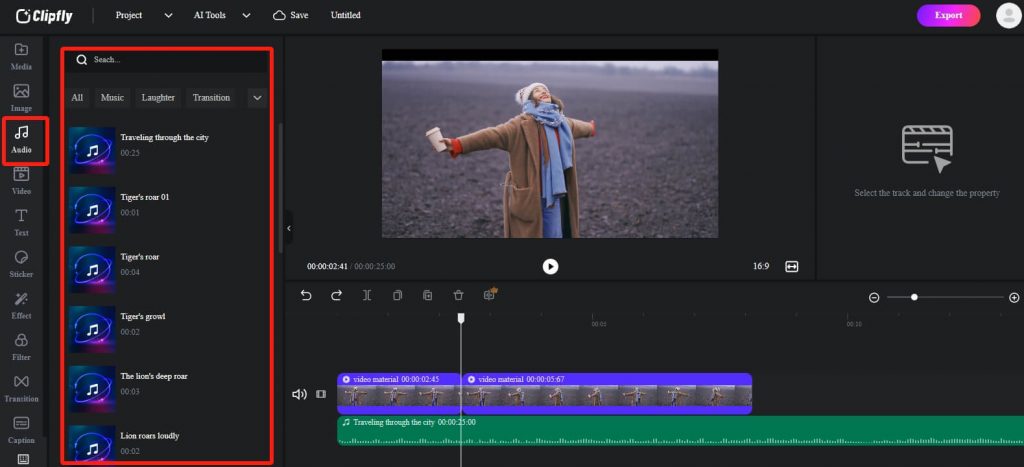
It is worth mentioning that Clipfly also provides a powerful AI tool to extract audio from videos, and you can easily save the extracted audio in MP3 format for use in other media projects. Additionally, you can click the “Speaker” icon on the left side of the main media track to mute the original video with one click, enhancing your audio-visual experience.
4. Personalize with Captions, Stickers, and More
Infuse your video with personality using Clipfly’s diverse range of creative elements. Add captions to convey messages, throw in stickers for a touch of whimsy, and experiment with additional features to make your video uniquely yours.
To add text to your video, click the “Text” in the right toolbar, next, click “Add Text”. A text box will appear on the canvas, allowing you to effortlessly input your desired script on the left. Customize the text font, color, position, and more to ensure your message is conveyed effectively to your audience.
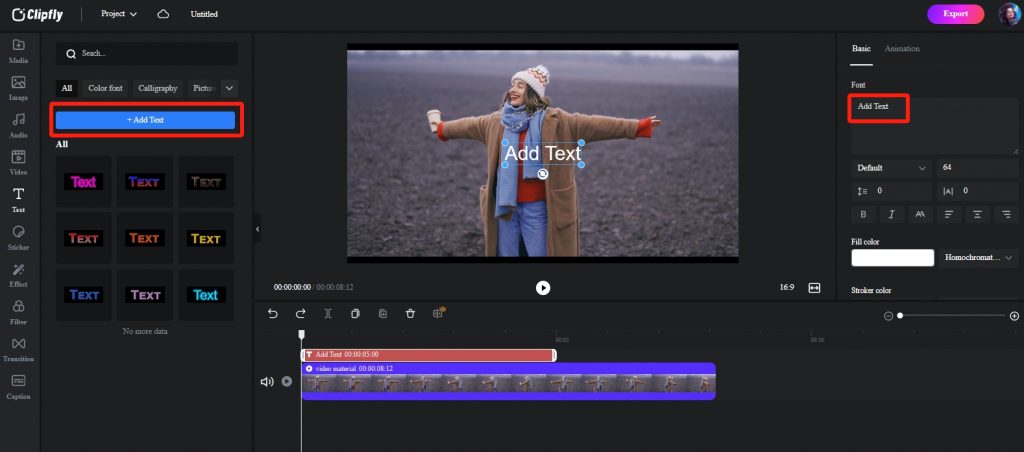
Adding stickers is just as straightforward. Explore Clipfly’s sticker library, choose your favorite stickers and patterns, and seamlessly incorporate them into the canvas. Take it a step further by making your videos truly distinctive with creative filters and effects.
5. Export Your Video
When your masterpiece is ready to hit the virtual stage, export it with ease. Click the “Export” button in the upright coner. A pop-up window will appear, allowing you to name your edited project, choose the desired quality (ranging from 480p to 4k), and set the frame rate and format. With everything set, download your masterpiece and effortlessly share it on social media!
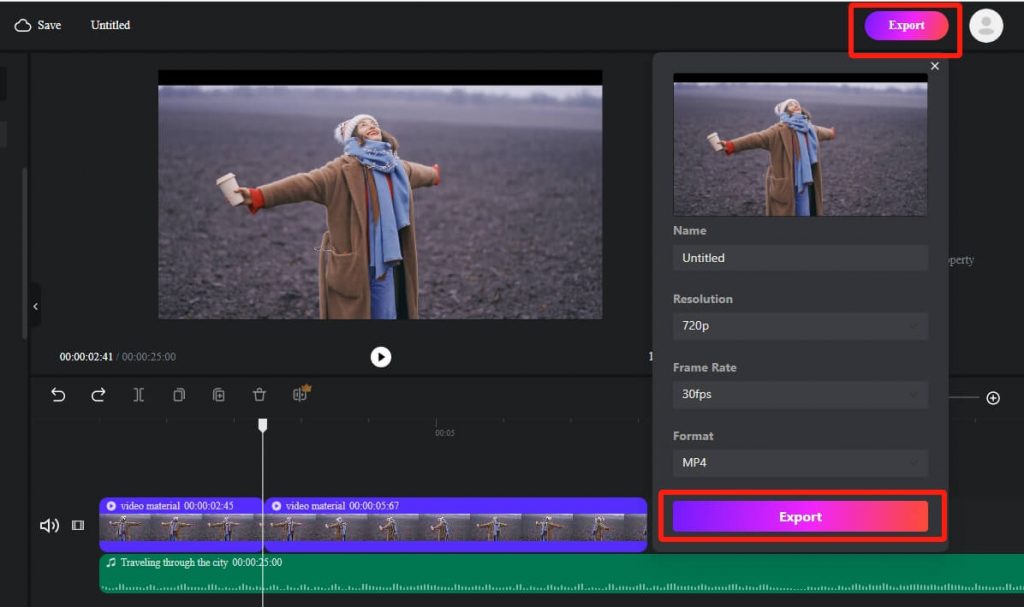
What we’ve covered are just some of the basic functions in Clipfly. Dive in and explore the myriad easy-to-use tools waiting for you. Start your trying now!
Conclusion
Embarking on the journey of video editing is a learning process, and remember, even the most skilled editors began as beginners. Embrace the learning curve, dive into practice, and watch your skills evolve.
With the most intuitive video editing tools and a wealth of complimentary tips on how to edit a video, your creativity is bound to blossom on the digital canvas. So, don’t hesitate, seize the opportunity to craft your masterpiece now!